How to configure your Victron Multiplus II 48/5000 + Pylontech US5000
Author: David Conesa Albaladejo
Date of publication: 15 May 2025
Date of update: 10 October 2025
The perfect combo; Victron Multiplus II 48/5000 + Pylontech US5000
Yes, most off-grid solar installations with batteries are nowadays made with this combination of Victron inverter charger and the famous Pylontech batteries. In relation quality / price is an excellent combination that provides all the guarantees and gives a very very safe result to have no problems in your installation for years, which is what we are all interested in.
New atIf you want a higher quality and higher capacity battery, take a look at the Pytes E-BOX 48100R. 100% Victron compatible and more efficient and safer.
How to configure the inverter Multiplus II 48/5000 with your battery pylontech US5000 correctly? In this post we will explain step by step how to do this configuration correctly. Save this post in your favourites to have it at hand when commissioning the Multiplus inverter with your pylontech battery.
Materials required for your installation with Victron Multiplus inverter + Pylontech battery
Although you could directly connect your pylontech us5000 battery to the Victron inverter and configure the Multiplus only by voltage absorption and float of the pylontech battery, it is not the most recommended option. Lithium batteries have an internal bms (control system) that squeezes the full potential of the battery and if we do not take advantage of it, we are "wasting" the real capacity that the battery offers. Therefore, it is recommended that the inverter and the battery bms "talk to each other" and share information about the battery status, cell voltage, temperatures, maximum charge and discharge intensity... Therefore, it is recommended to have at least the following elements in your installation so that your installation with your Victron inverter and pylontech batteries is as efficient as possible;
Details on the recommended minimum number of batteries to be considered;
Minimum number of Pylontech US5000 battery units recommended; it is necessary to explain the following about the difference between the nominal capacity of the battery and the recommended power that it offers us; Although the capacity of the battery is 4.8kW/h, the technical data sheet of the Pylontech US5000 battery indicates that the recommended nominal working current of the battery should be 50A. If we do some quick maths we get that 50A x 48V = 2400W. So the power recommended by the manufacturer that this battery is capable of delivering, will be 2400W and to achieve the power that the inverter offers us, we need at least 2 batteries in our installation. However, it also indicates that the maximum power is 100A, so if we do not want to pay attention to the recommendations or we are going to make occasional use of the maximum power of the battery, 1 unit of the pylontech US5000 battery is enough.
Quantity or number of cable kits required for Pylontech batteries;
Another fundamental point that must be taken into account to avoid fires is the minimum number of cable kits we need. It must be taken into account that the Pylontech cable kit for batteries has a diameter of 4AWG (American measurement) which is equivalent to about 21mm2 and although according to official data from Pylontech, the maximum intensity of the cable is 120A, the truth is that we recommend that no more than 80A should pass through each cable kit. It is therefore recommended that for each Pylontech US5000 battery we install a Pylontech cable kit; 1 battery = 1 cable kit.
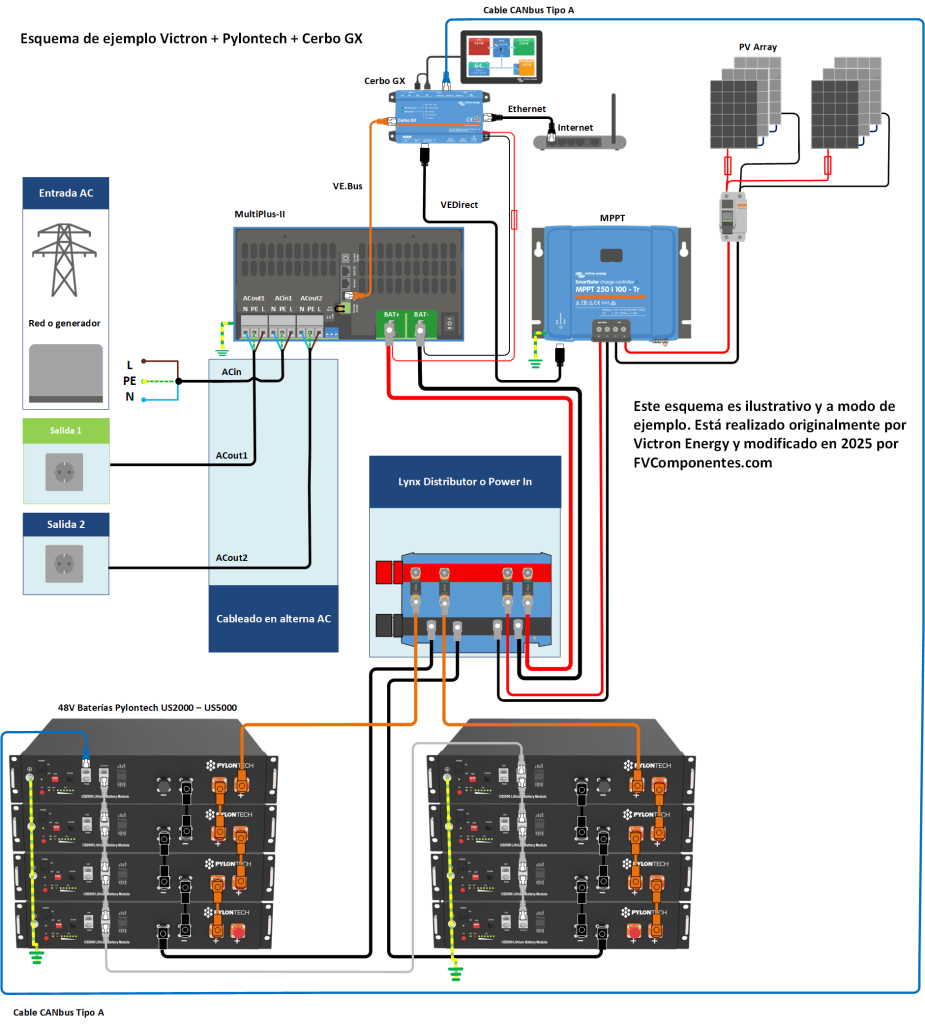
Wiring diagram Victron Multiplus and Pylontech
When it is time to connect everything, I leave you to use as a guide this wiring diagram of the Victron Multiplus II 48/5000 inverter with the Pylontech US2000C batteries. For the connection of the Pylontech US5000 battery you only have to add more Pylontech cable kits and if necessary another Lynx Power in or Lynx Distributor connected together.
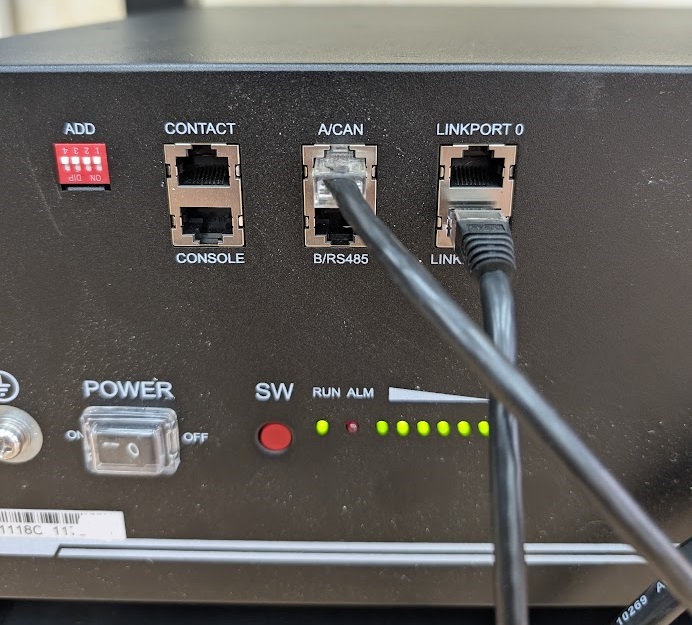
Remember that the CANbus type A connection cable that goes to the battery must be connected to the Pylontech battery in the A/CAN connector. On the first battery that is going to be the master.
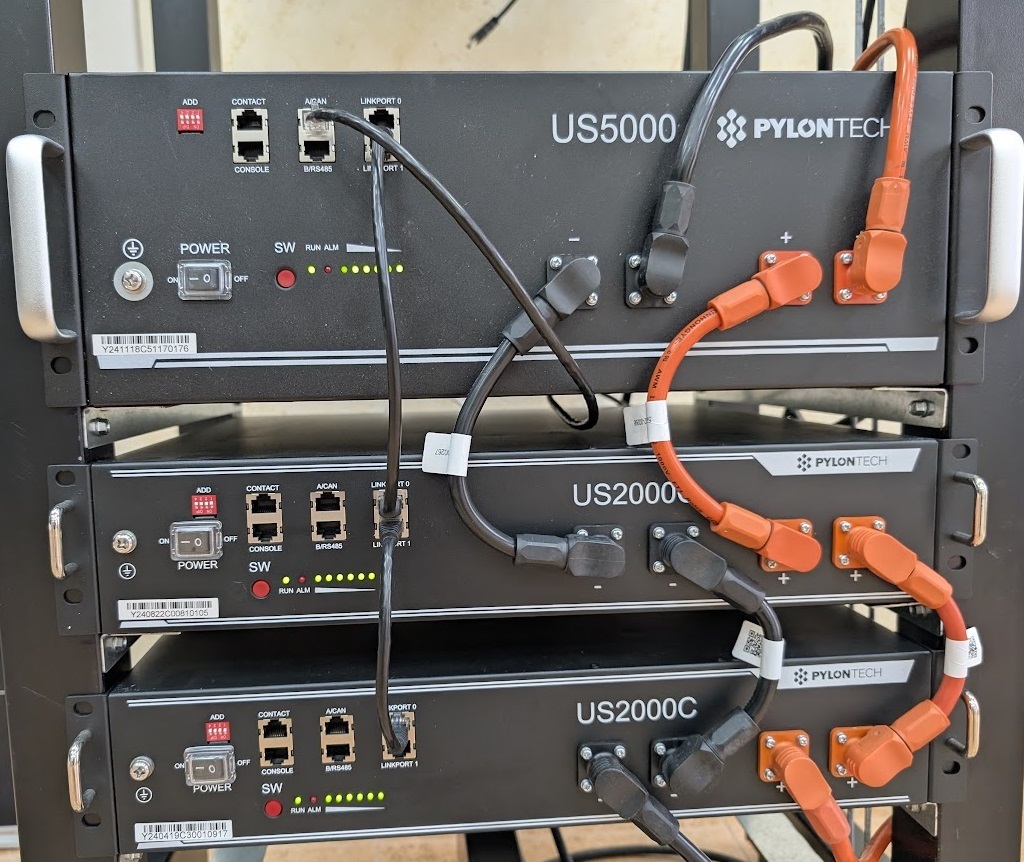
To connect further batteries, you have to connect from the battery1 the linkport1 connector to the battery2 on the linkport0 connector as you can see in the following image.
Finally, if you want to combine US2000C batteries with US3000 or US5000 batteries, remember that the biggest one should be the master battery and the rest should hang from it as slaves as you can see in the picture.
Victron Multiplus and Pylontech configuration
Once everything is connected, it is time to configure the whole system. To do this we enter the Cerbo GX via Bluetooth with our phone or computer connected to the internet. Select the Spanish language so that the names of the sections match. The parameters to be configured are as follows and in this order;
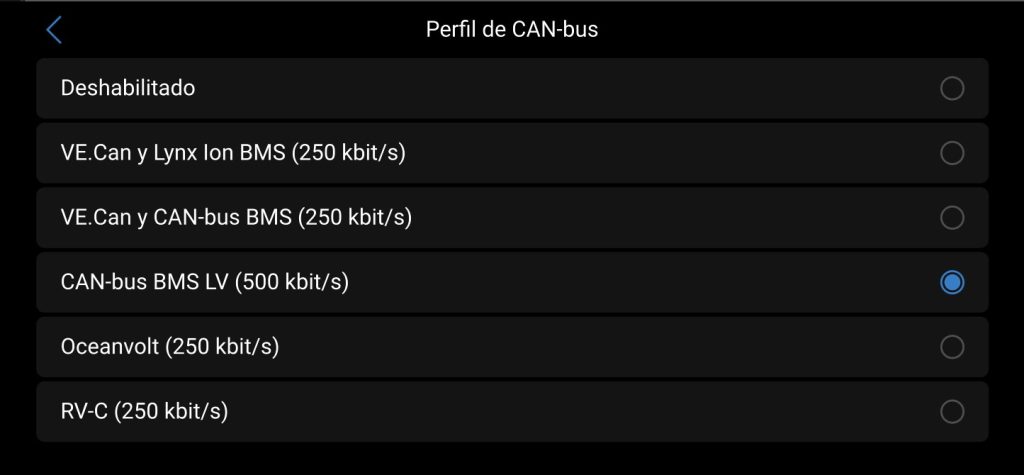
1. Configuration of the Cerbo GX
We configure the communication between the Cerbo GX and the batteries, for this we have to go to SETTINGS - CUSTOMER SERVICE - VE.CAN PORT and select the speed of 500Kbits per second as shown in the picture.
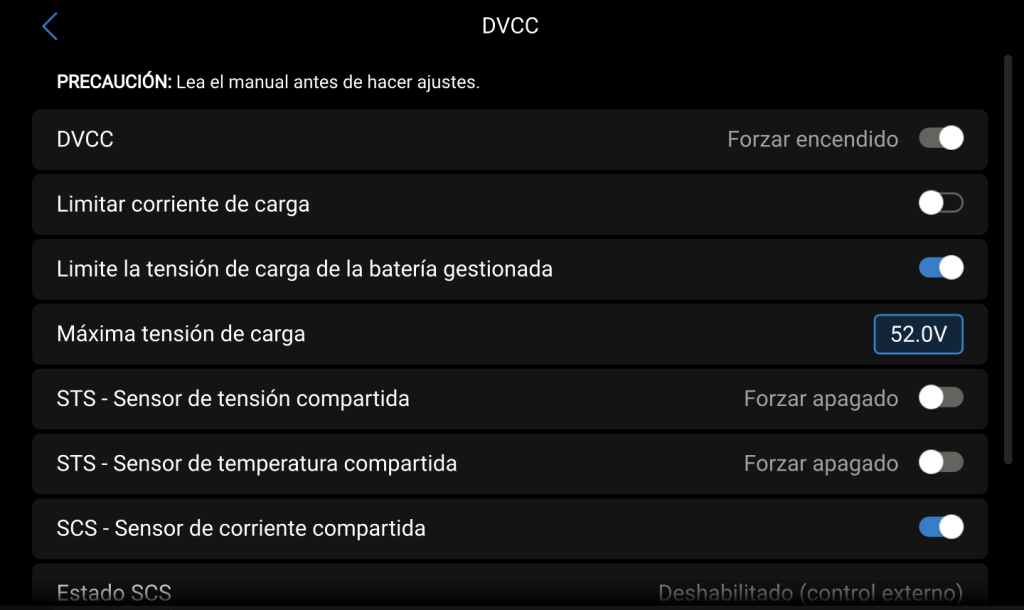
We then entered SETTINGS - DVCC and if we don't have it active, we activate it and also configure the "Limit the charging voltage of the managed battery"at 52.00V
It is important to limit this charging voltage in order to avoid for any reason that a higher voltage than allowed is produced and damages the batteries.
2. Configuring the inverter with VE Cofigure 3
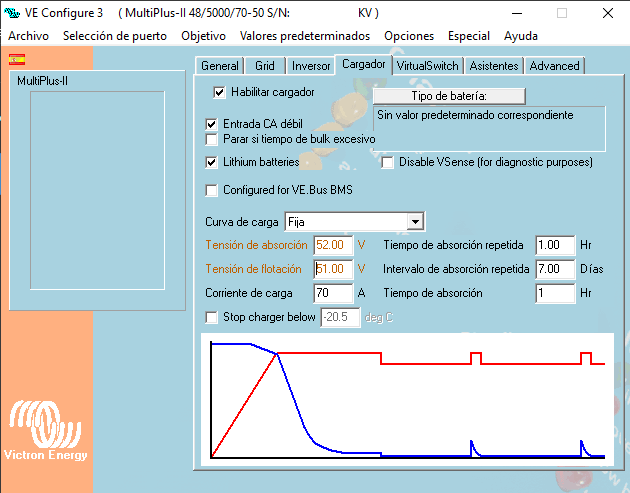
Once we install Ve Configure on our computer and connect directly with the MK3 cable or download the file from the VRM portal, we open it and in the "Charger" tab we configure the type of battery, as well as the Absorption values at 52.00V and float at 51.00V. On the other hand, we leave the absorption time at 1 hour and the charge current, we have to configure the maximum depending on the capacity of the battery and the wiring.
Once we have it, we save the file and upload it back to the inverter. This way, when we connect the inverter input to a generator or the mains, it will charge the batteries with the appropriate voltages.
3. Configuring the controller with Victron Connect
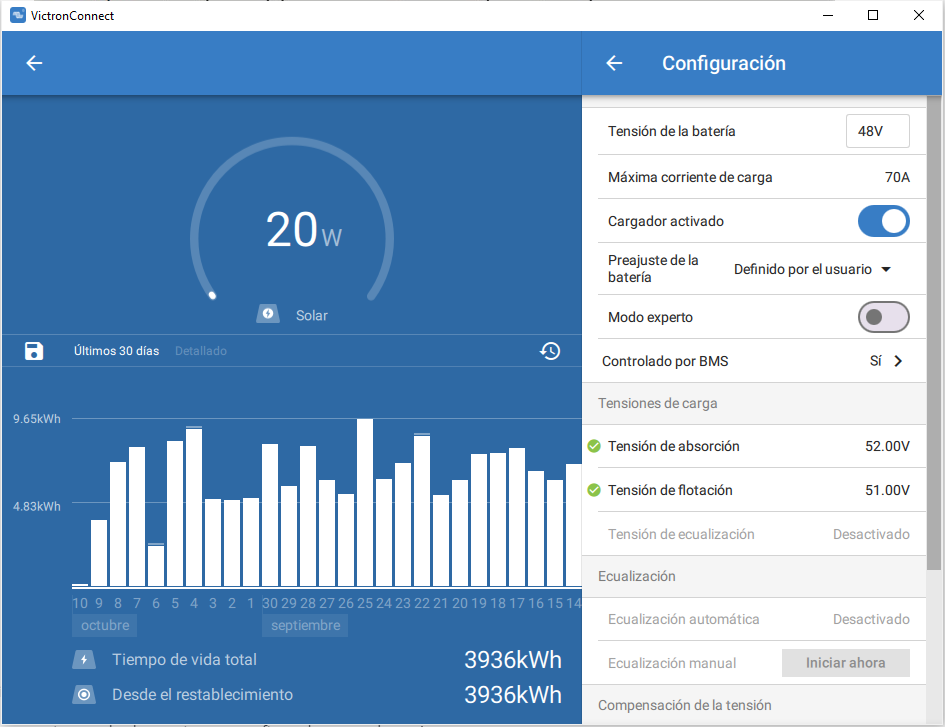
Well, we have already configured the Cerbo GX, the inverter too, but we are missing the regulator. If you are going to work with the DVCC in the Cerbo GX, the battery will set the maximum charge and current values, but what would happen if a cable is accidentally disconnected? Well, the regulator will use the voltage values it has configured. That is why it is important to leave them correctly configured so that if this happens, it does not damage our batteries due to an overvoltage.
The parameters we have to enter in the regulator are the same as in the inverter/charger; Battery type; Lithium - Absorption voltage 52.0V - Floating voltage 51.0V
With this, we can now use our inverter and make the most of all the possibilities it offers. In another post we will publish how to correctly configure a generator to your installation with Victron.
Remember that in our online shop we have off-grid solar kit where we can optionally send you all the equipment already configured, please contact us!
How to charge only with solar surplus with your Fronius Wattpilot charger. If you have batteries in your Fronius GEN24 inverter and you want to know how to configure your Fronius Wattpilot charger so that it does NOT use the battery to charge your electric vehicle and ONLY uses the photovoltaic solar surplus, you are in the right place... In this post
How to calculate the cross section of a cable? If you have doubts about how to calculate the cross-section of a cable, or you are looking for a cable cross-section table according to power, you are in luck. We have found these specific tables for 12V, 24V and 48V that will solve any doubts you may have about how to calculate the section of a cable.
If you are considering installing a PV system at home, you are probably interested in knowing how many solar panels you will need. Having it clear from the beginning is convenient to get an idea of what you will have to invest to start taking advantage of the potential of solar energy. That's why, in this post, we tell you how many solar panels, in
If you've been thinking about going solar, you've probably been wondering how much solar panels cost and how much it would cost to install them on your home. After all, although photovoltaic systems can help you reduce your electricity bills a lot, they do require an initial investment.